Showing posts with label Snacks. Show all posts

Sunday, September 19, 2010

Chewy Chocolate Brownie Cookies


Can't decide if you want brownies or cookies? No problem, just combine the two into one bite-sized handheld piece of ooey-gooey chocolate heaven.

When I was a kid, I used to make these with brownie mixes, but I reckon since I'm an adult, I should make the grown-up version.

  • 15g all-purpose flour
  • 1/8 teaspoon baking powder
  • Pinch of salt
  • 1 egg
  • 70g brown sugar
  • 1 tablespoon instant coffee powder
  • 1 teaspoon vanilla extract
  • 1 tablespoon unsalted butter
  • 100g fine-quality bittersweet chocolate (60% cacao or more), finely chopped if not using buttons
  • 1/2 cup chocolate chips

Preheat oven to 190C. Line 2 baking sheets with parchment paper. Melt butter and chocolate in a metal bowl set over lightly simmering water, stirring till smooth. Remove from heat and let cool to warm.

In a small bowl, whisk together the flour, baking powder, and salt. With an electric mixer, whip the eggs to break them up. Then add the sugar, espresso, and vanilla and beat on high speed for 15 minutes, until thick.

Gently fold the chocolate mixture into the egg mixture until partially combined (there should still be some streaks).


Add the flour mixture to the batter and carefully fold it in. Finally, fold in the chocolate chips. If the batter is very runny, let it rest until it thickens slightly, about 5 minutes.


Drop the batter by heaping tablespoonfuls onto the prepared baking sheets and bake until puffed and cracked, 8 to 9 minutes. Cool on a wire rack before removing from the baking sheets. Makes about 18 cookies.

Thursday, September 16, 2010

Pretty in Pink Raspberry Macarons


I'm reduxing raspberry macarons just because they're so yummy. Instead of two-toned shells, It's pretty-in-pink with lots of heart-shaped sprinkles.

Use 2 - 3 drops of red food colouring, and don't forget the sprinkles!
Perfect feet and smooth shiny tops.
Smooth creamy raspberry buttercream
Assembled and ready to eat

Citron Vanilla Macarons


Just in the mood for prettiness today. I'm not going to mess around with new flavours so I'll split the batch and make classic citron vanilla in a Tiffany's shade of blue with white buttercream. With the other half, I'll redux pretty-in-pink raspberry macarons.

Macaron shells:
  • 65g almond meal
  • 80g icing sugar
  • 40g caster sugar
  • 50g egg whites, aged
  • 1/2 teaspoon lemon oil
  • 3 drops sky blue food colouring

Preheat oven to 160C and prepare 2 baking trays lined with silicon sheets.

Sift almond flour and icing sugar in a bowl. Beat room temperature egg whites and caster sugar till stiff peaks form. Add dry ingredients to meringue and mix well until batter is smooth and thick. Add the lemon oil and tint the batter a pastel shade of blue.

From Tiffany's with love
Spoon the batter into a piping bag/gun with a 1/2-inch nozzle and pipe evenly onto the baking trays in 3cm globs, spaced about 4cm apart (the piped batter will spread about 1 cm). Scatter sprinkles of your choice (or none at all) and let the piped batter dry till the skin forms. Bake for 12 minutes.


Buttercream filling:
  • 100g butter, softened to room temperature
  • 150g icing sugar, sifted
  • 2 teaspoons vanilla bean paste

Beat butter till nice and smooth, then add icing sugar and vanilla paste and beat till light and creamy. Spoon into an icing bag and chill for 15 minutes in the fridge.


Pipe a hershey kiss-sized gob onto each shell and sandwich with another. Let sit in refrigerator overnight and warm up to room temperature before eating.

Wednesday, September 15, 2010

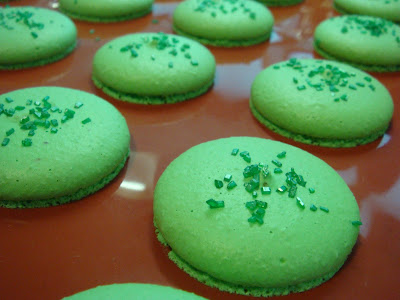
After Eights Macarons


Inspired by those thin mint choclates, I'm undecided about whether I'm eating macarons or toothpaste. Some folks love them, some hate them. I guess it all depends on how much you like mint.

A little unconventional as far as macaron flavours go, but what the heck. I like them. They're cute and pretty, and I can skip brushing my teeth afterwards.

I'll be doing the short version here, so for detailed step-by-step instructions and pictures of macaron technique, click here.

Macaron shells:

  • 65g almond meal
  • 80g icing sugar
  • 40g caster sugar
  • 50g egg whites, aged
  • 3 drops green food colouring
  • Green metallic sugar sprinkles

Preheat oven to 160C and prepare 3 baking trays lined with silicon sheets.

Sift almond flour and icing sugar in a bowl. Beat room temperature egg whites and caster sugar till stiff peaks form. Add dry ingredients to meringue and mix well until batter is smooth and thick. Tint the batter a pastel shade of green.

I love those sprinkles.
Spoon the batter into a piping bag/gun with a 1/2-inch nozzle and pipe evenly onto the baking trays in 3cm globs, spaced about 4cm apart (the piped batter will spread about 1 cm). Scatter metallic green sprinkles and let the piped batter dry till the skin forms. Bake for 12 minutes.

Aren't those feet so pretty?
Mint chocolate ganache:

  • 85g fine-quality bittersweet chocolate (60% cacao or more), finely chopped if not using buttons
  • 1/3 cup heavy cream
  • 1 tablespoon unsalted butter, softened
  • 1/2 teaspoon mint extract

Melt chocolate with cream and butter in a metal bowl set over a pan of lightly simmering water (bowl should not touch the water), stirring until smooth.

Remove bowl from heat and let cool a little, then add mint extract and stir well. Let stand at room temperature until cooled completely, spoon into a piping bag and chill for an hour till firm.


Pipe a dollop of ganache onto one side of each shell, the size of a Hershey's Kiss. Gently press down to sandwich the two sides together. Let sit in refrigerator overnight and warm up to room temperature before eating.

Monday, August 30, 2010

Loaded Double Chocolate Chip Cookies


Nothing quite beats the smell of freshly-baked cookies, especially if they're fully loaded with walnuts, dark and white chocolate.

The basic recipe is courtesy of a baking classic Joy of Cooking, and I've just piled on an obscene amount of chocolate and nuts. Oh joy...

Anyway, these are really easy and fast to make. From start to wash-up, 45 minutes max. So, there's really no excuse to settle for crappy supermarket cookies now is there?

  • 140g all-purpose flour
  • 1/2 teaspoon baking soda
  • 1/4 teaspoon salt
  • 115g unsalted butter, softened
  • 100g white sugar
  • 110g brown sugar
  • 1 egg
  • 1.5 teaspoon vanilla extract
  • 1 cup dark chocolate chips
  • 1/2 cup white chocolate chips
  • 3/4 cup chopped walnuts or pecans

Preheat the oven to 190C. In a large bowl, beat flour, salt and baking soda until well blended.

With an electric mixer, beat sugars and butter with the paddle attachment until smooth. Add the flour and continue beating till well mixed.

Next, add the eggs and vanilla extract and beat till you get a smooth batter. Finally, fold in the chocolate and nuts and mix well.

Drop teaspoon sized globs onto a baking tray, spacing them 2 inches apart (the cookies will spread while baking). Bake for 8 - 10 minutes until slightly coloured on top and edges are brown. Let cool completely.

Tuesday, August 24, 2010

Leek, Mushroom and Bacon Quiche


Ack. It's the curse of the fridge clean-out day, plus the sheer laziness of not wanting to go to the supermarket.

I thought I'd do quiche again, seeing that the earlier post didn't have too many pictures. And besides, I love quiche, and it will make a good lunch for tomorrow as well. I'm going to do the short version here, so click here for more details on technique and excessive blah blah blah.

For the shortcrust dough:

  • 125g all-purpose flour
  • 1/2 teaspoon salt
  • 110g cold unsalted butter, cut into 1/2 inch bits
  • 1/4 cup iced water, plus more as needed

Dump in all the dry ingredients into the food processor or mixer with a dough hook, throw in the butter and shortening. Whizz it around until the mixture resembles fine breadcrumbs.

Add the water slowly, until the dough starts to clump onto the blade or hook into a single mass. Remove and place onto a floured surface. Knead lightly until it forms a consistent ball. Roll it up into a ball and cover with cling wrap. Chill an hour in the fridge before using.


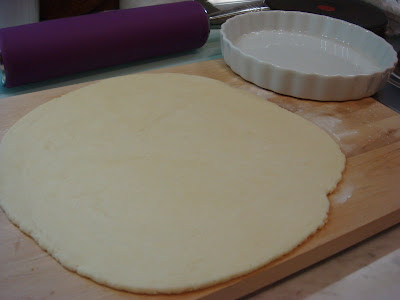
Preheat oven to 190C and grease a quiche tin. Roll out the dough in a circle 2 inches larger than the quiche tin on a floured surface.


Place the dough sheet over the greased quiche dish, gently press down into the bottom. Trim the excess dough 1/4 inch from the edge and crimp with your fingers to make the edge of the crust.


Prick the bottom with a fork. Place a piece of parchment or greaseproof paper over the crust, then fill with rice/ dry beans/ ceramic or glass baking beans. Bake for 7 to 10 minutes till light golden brown.

For the filling:

  • 2 eggs
  • 240ml cream
  • 1/2 stalk leek, sliced
  • 3 mushrooms, sliced
  • 4 rashers bacon, sliced and browned
  • Salt and pepper to taste
  • 2 tablespoon butter cut into pea-sized dots

Lightly beat eggs, cream, salt and pepper in a bowl. Arrange the sliced leek, mushrooms and bacon in the crust, then pour over the egg and cream mixture. Dot with butter and bake at 190C for 25 - 30 minutes or until quiche has puffed and browned.

Saturday, August 14, 2010

Strawberry and Spice Preserves


I just don't understand how the same stuff can be cheap and expensive at the same time. I was at Cold Storage the other day, and there were ridonkulously expensive and ricockulously cheap strawberries from Driscoll sitting side-by-side on the shelf.

I don't get it. Apart from the size of the packaging, they looked pretty much the same. Same brand, same fruit, same smell... even the packaging didn't say one was more chi-chi or organic. One package was $14.99 for 500g, and the other was TWO 500g packs for $5.99. I just don't get it.

This is a lesson in retail girls and boys. If a shopper can't discern the difference between two identical products at first glance, they will default to the cheaper option. Which means those expensive but utterly un-fancy strawberries are going to rot till they get consigned to the bargain bin. Bad for Cold Storage if they can't move pricy inventory by making retarded merchandising choices.

What is not retarded however, is my strawberry jam. It's a little decadent because I'm using a whole vanilla bean, but I really don't care. What's life if you don't pimp it out anyway?

  • 500g red, ripe strawberries
  • 500g sugar
  • 50ml lemon juice, strained
  • 1 cinnamon stick
  • 1/4 teaspoon ground cinnamon
  • 1/4 teaspoon ground nutmeg
  • 1 whole vanilla bean

Wash and hull strawberries, leave the small ones whole and halve the larger ones. Prepare the vanilla pod by making a slit lengthwise on the bean, then scrape out all the gooey sticky seeds with the back of your knife.


Combine berries with sugar, lemon juice, cinnamon and nutmeg in a large bowl. Add the vanilla seeds, as well as the remaining pod and let stand for 3 to 4 hours so that the sugar melts and the flavours come together.


Bring strawberries to a boil slowly, stirring occasionally. Cook rapidly until strawberry mixture has reduced to a thick jam-like consistency, about 15 minutes.


Pour mixture into a shallow pan and let stand, uncovered, for 12 to 24 hours. Remove the vanilla bean pod but leave the cinammon stick in because it will look really pretty in the jar and continue to perfume the preserves. Ladle strawberry mixture into hot, sterilized jars, leaving 1/4-inch headspace. Process for 10 minutes in a boiling water bath.

Thursday, August 12, 2010

Raspberry Macarons with a Buttercream Filling


Weekends are great macaron making days. Laid-back, relaxed and stress-free. I love taking my time with them, the repetitive motions are super therapeutic and soothing.

This a a classic macaron flavour, with a fresh raspberry twist in the filling and two-toned shells. So patriotic and pretty!

I'll be doing the short version here, so for detailed step-by-step instructions and pictures of macaron technique, click here.

Macaron shells:
  • 65g almond meal
  • 80g icing sugar
  • 40g caster sugar
  • 50g egg whites, aged
  • 5 drops red food colouring

Buttercream filling:
  • 100g butter, softened to room temperature
  • 150g icing sugar, sifted
  • 10 fresh raspberries

Preheat oven to 160C and prepare 3 baking trays lined with silicon sheets.

Sift almond flour and icing sugar in a bowl. Beat room temperature egg whites and caster sugar till stiff peaks form. Add dry ingredients to meringue and mix well until batter is smooth and thick.

Divide batter into two bowls and tint one half with food colouring for a bright vibrant red. Leave the other half white.

Spoon the batter into a piping bag/gun with a 1/2-inch nozzle and pipe evenly onto the baking trays in 3cm globs, spaced about 4cm apart (the piped batter will spread about 1 cm). Let the piped batter dry till the skin forms and bake for 12 minutes.


To make the icing, beat butter till nice and smooth, then add icing sugar and beat till light and creamy. Add the raspberries and continue beating at high speed till the mixture is nice and smooth. Spoon into an icing bag and chill for 15 minutes in the fridge.

Pipe a hershey kiss-sized gob onto a white shell and sandwich with a red shell. Let sit in refrigerator overnight and warm up to room temperature before eating.

Other items on the Red, White and Ooohhh menu:

Wednesday, August 11, 2010

Cream Scones


"Fancy a spot of tea luvvie?"

Since I'm all unemployed these days, then I reckon I should do the tai-tai thing and have tea. And since nobody does tea better than the Brits, so I'm channeling Margaret Thatcher and having some scones and tea.

Scones are dead easy to make. In fact, it's the very first thing I ever cooked, courtesy of home economics class in school. My version amps up the sin factor, with heaps of cream and butter.

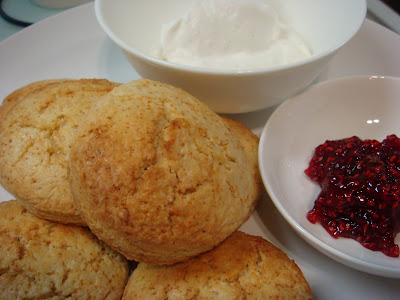
Rich and buttery, they're the perfect vehicle for lashings of homemade raspberry preserves and a massive dollop of freshly made whipped cream.

Makes 20 scones:
  • 370g all-purpose flour
  • 40g caster sugar
  • 3 teaspoons baking powder
  • 1/4 teaspoon salt
  • 170g cold unsalted butter, cut into pieces
  • 1 egg
  • 1 egg yolk
  • 1 teaspoon pure vanilla extract
  • 225 ml cream

Preheat oven to 200C and place the rack in the middle of the oven. Line a cookie sheet with parchment paper.

In a large bowl, sift together the flour, sugar, baking powder and salt. Cut the cold butter into small pieces and blend into the flour mixture with a pastry blender. Alternatively, whizz in a food processor like I do. The mixture should look like coarse crumbs.

Lightly beat egg and egg yolk. Keep half for the glaze and combine the rest with the cream and vanilla. Add this mixture to the flour mixture. Stir just until combined. Do not over mix.

If you are using a food processor, add the liquid mixture bit by bit and pulse in between. The dough will start to mass and pull away from the sides.

Knead dough gently on a lightly floured surface. Roll or pat the dough into a circle that is about 3cm thick. Then, using a 6cm round cookie cutter, cut the dough into rounds. Place the rounds on the prepared cookie sheet, spacing a few inches apart.

Make an egg wash using the leftover egg and some water. Brush the tops of the scones with the egg wash. This helps to brown the tops of the scones during baking.

Bake for about 15 - 18 minutes or until nicely browned and a toothpick inserted into the center of a scone comes out clean. Remove from oven and transfer to a wire rack to cool.

Other items on the Red, White and Ooohhh menu:

Monday, August 9, 2010

Raspberry Preserves


I heart jam, but find store-bought ones just way too sweet. Making your own is easy enough, and you get to load up on the fruit and cut down the sugar. My spin on it is the addition of vanilla bean paste. Subtle, but it makes all the difference in flavour.

The secret to delicious and vibrantly coloured jam is rapid cooking in small batches. This recipe is for 1 large or 2 small jars and they will keep in the fridge unopened for up to a month.

  • 350g raspberries (this can be replaced with strawberries, or any other berry you want)
  • 300g white sugar
  • 1/8 cup fresh lemon juice, strained
  • 1 teaspoon vanilla bean paste

Sort raspberries, discarding any that are too soft, mouldy or generally suspicious. Rinse them and drain them well. If you're using frozen berries, thaw and save all their juice.


Stir the raspberries (including the juice if using thawed berries), sugar, lemon juice and vanilla bean paste together in a bowl and let the mixture chillax, stirring gently once or twice until the sugar has dissolved. This will take about 2 hours, or if you're really lazy, just let it sit in the fridge overnight.

Make sure you've washed the glass jam jar in boiling hot water and are keeping it hot.


Chuck the berry mixture into a large skillet and bring it to a boil, stirring constantly with a straight ended spatula, and boil rapidly for 6 minutes.


The mixture will begin to thicken, so keep stirring constantly. Remove from heat when it's thick and can't reduce any more.


There will be some foam on the top, but if you let the jam stand for a few minutes, the foam should subside. If it doesn't, simply skim off with a spoon.


Ladle hot preserves into the hot jar, leaving 1/4-inch clear space. Heat a pot of water on the stove, when it comes to a boil, place filled and sealed jar of jam in the water bath for 10 minutes to pasteurise.

Other items on the Red, White and Ooohhh menu:

Thursday, August 5, 2010

Nonya Kaya


Kaya making is an assertion of my Peranakan roots. It also requires a very specific mindset and mood. One must be very calm, zen and patient, so pick a day where you have jack-all to do.

Seeing that insomnia has been my best friend lately, making kaya at midnight seems like a perfectly reasonable thing to do. But I digress...

The mantra for the kaya-making day is "slow and gentle" - lovemaking, as opposed to f**king. There is a pick-up on the tempo at the end though, for a grand finish. You'll see what I mean... Just keep reading.

Right, now on to the kaya. Ingredients are simple enough. Coconut milk, eggs, sugar and pandan leaves. Proportions are a snap to remember: it's a 1:1:1 ratio of coconut milk, eggs and sugar.

But my spin on kaya is gula melaka. It gives it a smoky caramelly flavour that is just to die for. If you don't like gula melaka then replace with sugar... but hey, you don't know what you're missing.


  • 400g of coconut milk (use the ones found in the chiller, tetrapak or tinned milk ain't so great)
  • 200g white sugar
  • 200g gula melaka, chopped fine
  • 400g eggs (approximately 15 eggs)
  • 20 stalks pandan leaves, washed, dried and tied into bundles

Break eggs into a bowl and gently whisk. What you want to do is combine the whites and yolk but not add air into it.

Next, mix the white sugar and gula melaka in a large metal bowl. Add coconut milk and eggs and gently stir. Once again, the whole point is to mix well, not beat the living shit out of it.

Leave it for awhile to let any larger lumps of gula melaka melt, until you get a consistent liquid with no big lumpy bits. The smaller lumps will melt when on the heat, so don't worry too much about them.

Heat a large saucepan of water, about 1/3 full and bring to a gentle simmer. Add the pandan leaves and place the metal bowl over the water and start stirring with a wire whisk.


Be careful with the heat. The water shouldn't be on a crazy boil, with steam escaping everywhere and the bowl rattling over the pan. There shouldn't be steam escaping and the bowl should sit firmly on the pan.

Basically, from here onwards, it's just stir, stir and more stir every few minutes for the next hour or so. The liquid will slowly thicken into a custardy consistency. It helps to have the TV on, or put your significant other on stirring duty.

And yes, if you go to the loo for a pee or a smoke break, it'll be ok. It's kaya, not a time bomb.


Halfway through, pour the fairly thick liquid through a sieve to remove lumps and bits of pandan leaves, then return to heat and keep stirring. Check occasionally that the water hasn't dried up and top up when necessary.


When the kaya is starting to really thicken, remove the pandan leaves. From this point onwards, you may release your pent-up frustration and whisk more vigorously.

The kaya is done when it's thick enough to coat the whisk like so:


Remove from heat and let cool. As it cools, whisk the crap out of it periodically. Why? Because it's already caused you so much grief, the bastard deserves it.

No, not really. First off, it breaks up lumps and gives the kaya a smooth creamy texture. Second, it just helps it cool faster.

Make sure you let the kaya cool completely to room temperature before sealing it and refrigerating. Sealing a hot jar will cause water to evaporate and collect on the kaya and it'll go bad real quick.

Let it refrigerate for at least a day for the flavours to come together before eating. It will also thicken up a bit more for the right spreading consistency.

I told you it isn't hard... Just long and tedious, but infinitely satisfying.

"Slow and gentle... Sloooooooow and gentle... Now harder... Harder... YEAHHHHH!!!!"

Other items on the Childhood Comforts menu:

Monday, August 2, 2010

Chocolate Hazelnut Truffles


Screw Ferrero Rochers. I can do a better job making my own. That, and a big bag of hazelnuts sitting on my kitchen counter that I don't know what to do with.

Makes 30 pieces:
  • 170g fine quality chocolate (60% cacao or more)
  • 2/3 cup cream
  • 1 tablespoon unsalted butter
  • 75g of toasted chopped hazelnuts
  • 30 hazelnut halves (for decorating)
  • Cocoa powder

If your hazelnuts are raw and have skins, the first thing you need to do is toast and de-skin them. Place a single layer of the nuts on a baking tray lined with greaseproof paper and toast in a 180C oven for 12 minutes. When cool, simply rub them around in your hands until the skins come off.


Place a metal bowl over lightly simmering water and melt chocolate and cream. Whem melted, remove from heat and stir in butter and chopped hazelnuts. Pour into a square of rectangular pan lined with cling wrap and refrigerate for 3 - 4 hours till set.


When set, cut truffles up into squares. Place a hazelnut half on each truffle and roll in cocoa powder. Set on a tray lined with greaseproof paper. Chill in the fridge for another hour and it's good to go.

Sugar and Spice Almonds


There are some days where I just yearn for comfort and familiarity. Where I want nothing more than to curl up into a ball in front of the TV and snack.

It's funny how sweet and spice come together so well... It's faintly reminiscent of how all of life's ups and downs come together in a way that is totally unexpected.

You will need:
  • 250g of almonds (or any other raw nuts)
  • 4 tablespoons sugar
  • 4 tablespoons water
  • 1/2 teaspoon cinnamon
  • 1/2 teaspoon nutmeg
  • 1/2 teaspoon allspice


Boil water and sugar until dissolved into a clear syrup, then add the spices and mix into a well blended paste. Add almonds and stir for 1 minute.

Spread into a single layer on a tray lined with greaseproof paper and toast in a 180C oven for 12 - 15 minutes, then let cool completely.


Break up into clusters and store in an airtight container.

Thursday, July 1, 2010

Singaporean BBQ Chicken Wings

This is a must-have at any BBQ, and this is my mum's recipe - with a few of my modifications of course.

If you're not going to barbeque these chicks, then roasting in the oven at 180C for 30-40 minutes till golden brown works well too. For a deeee-lish beer snack, deep fry the wings and serve with a sweet Thai chilli sauce.

Smoky, spicy, caramelly and absolutely to die for, the trouble of starting up the barbeque will be well worth it.

For 8 wings with drumlet attached:
  • 2 tbsp peanut oil
  • 1 tsp sesame oil
  • 2 tbsp chinese rice wine
  • 1 tbsp honey
  • 1 tsp five spice powder
  • Freshly ground black pepper
  • 2 tbsp ginger juice (Pound ginger and squeeze out juice. Ginger is a natural meat tenderizer so your chicken wings will be melting off the bone when cooked. Plus it gives it a spicy zing.)
  • 1 tsp dark soy sauce
  • 1 tsp light soy sauce
  • 1 tbsp Japanese teriyaki sauce (optional)

Wash and dry chicken wings and marinade with all ingredient except the soy and teriyaki sauces. Cover with cling wrap or place in airtight container and marinate for at least 3-4 hours, or overnight ideally.


The reason why you should only add the soy sauce or any salt to any marinated meat just before cooking is that salt leaches the juices out from the meat and causes it to toughen. Now you know.

Before cooking, add soy sauce and skewer onto metal or wet bamboo skewers. Soaking the skewers in water prevents it from burning when on the barbeque. Skewering them opens out the wings and helps the meat get crisp and brown evenly. It also makes for faster cooking which is always welcome at a barbeque.


As you barbecue the wings, use the leftover marinade to baste for extra flavour.

See the rest of the BBQ Bonanza menu here: