Wednesday, June 30, 2010

Baileys Chocolate Truffles


Why fork out an obscene amount of money for chocolate truffles when you can make your own in a snap?

I'm talking uber premium stuff here. The finest quality Valhorna chocolate and cocoa, fresh cream and pure butter. The cost of ingredients will probably cost you around $12 for 30 regular sized pieces. That's $0.40 cents a pop for pure chocolate heaven.

Makes 30 pieces:
  • 170g fine quality chocolate (60% cacao or more)
  • 2/3 cup cream
  • 1 tablespoon unsalted butter
  • 4-5 tablespoons Baileys liqeuer


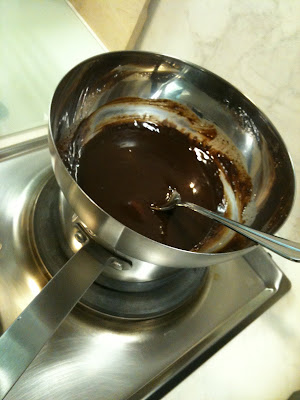
Place a metal bowl over lightly simmering water and melt chocolate and cream. Whem melted, remove from heat and stir in butter and Baileys (or any other liqueur or flavouring you prefer). Pour into moulds and place in refrigerator to set for 2 hours.


Speciality baking supplies stores like Phoon Huat have special moulds in all shapes and sizes if you're really into chocolate making. But for the occasional chocolatier who can't bother with moulds, just pour the chocolate into a square tin lined with cling wrap. Once it's set, pull the cling wrap up to remove chocolate from the tin and cut it into squares with a knife warmed in hot water ala Royce style.

When the truffles have set, pick each up up with a toothpick, roll in cocoa powder and voila! Truffle heaven.

Classic Homemade Tomato Pasta Sauce


If you're guilty of using canned or bottled tomato sauce for your pasta, for the love of god and everything sacred, please stop NOW. It's just wrong on so many levels that I don't know where to start ranting.

First of all, it tastes like crap.

Second, it's way too consistent in texture. Part of what makes a good pasta dish is the rough bits of tomato and herbs in the sauce that gives it some bite.

Third, it's just WRONG. I can't say it enough and I'll say it again.

Here's what you need:
  • 1 can whole roma tomatoes
  • 3 cloves of garlic, sliced or minced (sliced garlic yields a gentler flavour, while minced gives the sauce a stronger garlic kick)
  • 2 tablespoons of concentrated tomato paste
  • 6-8 basil leaves, thinly sliced
  • 1/2 teaspoon of oregano
  • Sea salt and freshly ground pepper to taste

Heat olive oil in a saucepan on medium heat. Fry garlic till soft, taking care not to let it burn and get too brown (over-browned or burnt garlic has a nasty bitter taste).

Squash the tomatoes roughly in your hands into the pot, pouring all the juices from the tin. Using a spoon, break up large chunks of tomato into smaller bits. Add the tomato paste, basil leaves and oregano and stir well. Season with salt and pepper to taste.

Gently simmer on low heat till slightly thickened for about 15-20 minutes.

Here's another thing you can make with this basic recipe and technique. To make an Italian inspired ketchup, continue simmering until reduced to a thick paste. The volume should be reduced to about half. When that happens, chuck it into a food processor and puree to a fine paste. There you go, the best ketchup you've ever tasted.

Make the sauce base in advance and store in the fridge if you're time-strapped. Otherwise, proceed to whip up your favourite tomato-based pasta.

See, easy peasy and utterly divine. Good as a base, or even on it's own.

BBQ Bonanza

Miss Z's birthday barbecue is coming up soon and I'm trying to figure out a menu that's a little different from the same-old same-old. Here's what I'm thinking:

For starters and appetizers:

For mains:

For sides:

And for the dessert and birthday cake, an authentic New York cheesecake with a berry topping. But then again, I do that quite often... Maybe a double chocolate fudge cake might be a good change of pace. Or maybe a Tiramisu? I don't know...  I'll ask Miss Z tomorrow and let her take her pick.

Post-weekend will be a blogging bonanza of recipes and food porn. Stay tuned...

Tuesday, June 29, 2010

Cheater Chicken Rice


Here's another quick-fix weekday meal. Fast and easy to make, even faster to wash up.

I love Chicken Rice, but it's also fattening. This is an easy version that's oil-free, but full of flavour.

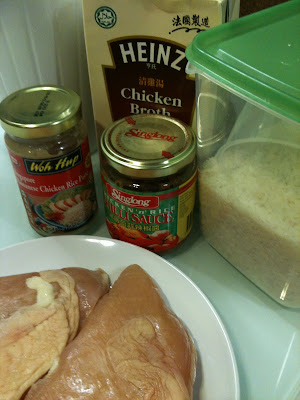
Once again, the trick is stocking up on some store-bought essentials ahead of time:
  • Chicken stock - This is essential for any kitchen. You'll need it in most recipes, and replacing water with stock provides an extra burst of flavour.
  • Chicken rice paste - Woh Hup is good.
  • Frozen chicken
  • White rice
  • Chicken rice chilli - I like SingLong.

Serves 2:
  • 1 cup rice
  • 1 cup chicken stock
  • 5 tablespoons chicken rice paste
  • 2 pieces chicken parts, diced into bite-sized chucks
  • 2 pandan leaves, bruised and tied into a knot (optional)
  • Chicken rice chilli and dark soya sauce to serve

Wash the rice and drain the water. Add chicken rice paste, stock, pandan leaves and chicken meat to the rice and stir. Cook, eat and enjoy.

Raspberry Chocolate Macarons


Alright, here's the big kahuna, the Mount Everest of baking. The delicious and dreaded macaron.

This is a tried, tested and proven recipe. Pierre Hermes and Laduree, you ain't got nuthin' on me. You may rule Paris, but I got tropical weather macarons down pat. I've tried the Canele ones, and I must say, mine are just as good, if not better (can you see my head growing bigger?). Ok, ok... maybe not better but I definitely give them a run for their money. Not bad for an amateur baker with a 2m x 2m kitchen.

First, the essential must-haves:
  • Weighing scale
  • Silicon baking sheets (Silpat) or non-stick baking paper sheets
  • Baking trays
  • Mixer or wire whisk (I don't recommend whisking the meringue by hand. It is literally too painful.)
  • Metal mixing bowls
  • Spatula (plastic or rubber)
  • Sieve
  • Large piping bag with 1/2-inch round nozzle 
  • Oven thermometer (if you don't have a digital oven)

Next, the  ingredients:
  • Egg whites - aged in the refrigerator for at least 24 hours, 48 is ideal
  • Finely ground almond powder - also called almond flour
  • Icing sugar
  • Castor sugar - the finest grain sugar available
  • 1/4 teaspoon of  cream of tartar


 Then, the basic ratios based on 1 unit of egg white of 50g:
  • 1.3 almond meal x 50g egg white (1.3 x 50g = 65g almond meal)
  • 1.6 icing sugar  x 50g egg white (1.6 x 50g = 80g icing sugar)
  • 0.8 caster sugar x 50g egg white (0.8 x 50g = 40g caster sugar)
  • Egg white 50 gm
  • Total weight of ingredients = 235g

Preheat your oven to 160C.

Here's an important note: An oven that's too hot will cause the tops of the macaron shells to crack. If you're experiencing that problem, turn down the heat to about 150C. If you're making mini-sized petit four macarons (about 2cm in diameter or less), set the temperature at 140C.

Stack two or three heavy baking trays. Line the top tray with non-stick baking paper or silicon baking sheets. If you're not adept with piping, mark the paper with 3cm circles, spaced about 4cm apart.

Sift the icing sugar and almond meal into a bowl to remove lumps of powder. Set aside.

In a clean bowl, beat the room-temperature egg whites, cream of tartar and sugar until stiff peaks form and you have a firm, glossy and compact meringue. You'll know you have the right consistency when the peak of the meringue stands up by itself, like in the image below. If it flops over, it's known as soft peak and not done yet.


Sift the dry mixture over the meringue and fold in with a spatula using a circular motion around the bowl, scraping under the batter and folding it over. You don't need to be gentle, but don't beat the crap out of it either. The whole point is to mix in the dry ingredients quickly without over mixing the batter. It's better to under mix than over mix, because you can mix it more later if the consistency isn't right. Add colourings or flavourings at this point.


A quick note of colours and flavours. Use powder or concentrated gel colourings as it doesn't add more moisture to the batter. You didn't go through all that trouble to dry your egg whites just to put liquid back in. On flavours, use natural extracts rather than the artificial stuff. If you don't have the natural stuff, then it's better to leave it au naturel.

The final batter should be smooth and thick but flowing (often referred to as being "like magma", but like as if we've ever seen lava flowing out of a volcano before. Duh...). Basically, a ribbon of batter dropped from the spatula to the top of the batter should take about 30 seconds to disappear.


Spoon the batter into a piping bag/gun with a 1/2-inch nozzle and pipe evenly onto the baking paper/ silicon sheet in 3cm globs, spaced about 4cm apart (the piped batter will spread about 1 cm).


You'll get little peaks after piping like in the picture below. Mild peaks should settle back into the batter eventually. If they don't disappear, whack the tray repeatedly on a table until the peaks disappear. Usually the batter will spread a little and any bumps will disappear.


Let the piped batter dry so that a "skin" forms on the top  of each macaron. This can take from anywhere from 20 minutes to never in our humid weather, so have a hairdryer on standby. This post will explain why the skin is necessary and the hairdryer (yes, I know it's weird, but it works).


Bake the macarons tray by tray on the centre rack.

At the 5 minute mark the shells should have lifted and developed "feet". At the 6-7 minute mark they should be starting to colour just slightly. Rotate the baking tray if the colouring is uneven. Bake for 12 minutes in total.


Stand back and admire those pretty little feet. Yes, you're gorgeous... Yes you are!

If you are using a silicon baking sheet, allow to cool completely before removing the shells. If they stick to the sheet, place them in the freezer for awhile to help with the sticking problem.

If you're using paper, spritz a little water from a spray bottle under the paper while still hot. The steam created will help release the shells from the paper.

Lay the cooled macaron shells face up and match them according to size (this is where the anal-retentive part of me is really enjoying herself).


For the raspberry ganache filling, you will need:
  • 85g fine-quality bittersweet chocolate (60% cacao or more), finely chopped if not using buttons
  • 1/3 cup heavy cream
  • 1 tablespoon unsalted butter, softened
  • 1/2 teaspoon raspberry extract


Melt chocolate with cream and butter in a metal bowl set over a pan of lightly simmering water (bowl should not touch the water), stirring until smooth.


Remove bowl from heat, then add raspberry extract. Let stand at room temperature until cooled completely, spoon into a piping bag and chill for 20 minutes till firm.

Now you're almost at the home stretch and ready to assemble the macarons.

Pipe a dollop of ganache onto one side of each shell, the size of a Hershey's Kiss. Gently press down to sandwich the two sides together.


Haha... I lied. You're not at the home stretch yet.

Macarons taste best when refrigerated and eaten the next day. The process of chilling in the fridge and warming back up to room temperature allows the moisture from the filling to meld with and soften the inside of the shells to create that unmistakable crisp outside and chewy soft inside.


Be patient and wait. It will be worth it. Oh yes it will.

Italian Idyll


Think of a small village in Tuscany, the sun is shining and the pace of everything slows down. A meal is all about the freshest ingredients and preparation that lets natural flavours shine through.

The second in the menu series is inspired by the simple life, uncomplicated and full of heart and soul.

Appetizer: Bruschetta
Entree: Pasta Carbonara
Dessert: Tiramisu
Drink: Summer Berry Sangria

La dolce vita!

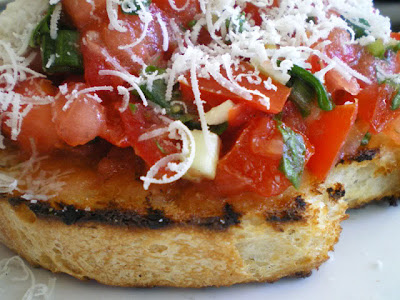
Bruschetta with roma tomatoes and mozzarella


There's something about bruschetta that's so simple, yet so tantalising. It's probably the combination of crisp and moist textures, with tart and rich flavours all going on at the same time.

Serves 2:
  • 6 slices of a crusty rustic white bread, toasted
  • 4 basil leaves, thinly sliced
  • 2 large roma tomato, diced
  • 1 piece of fresh buffalo mozzarella, cut into small cubes
  • Extra virgin olive oil
  • Balsamic vinegar
  • Sea salt and freshly ground black pepper to taste

While the bread is toasting, combine tomatoes, basil and mozzarella in a bowl. Drizzle on just enough olive oil to coat the mixture lightly, along with a wee splash of vinegar. Season to taste with salt and pepper, then heap onto each slice of toast. Before serving, drizzle liberally with olive oil and garnish with grated parmesan reggiano.

See the rest of the Italian Idyll menu here:

Entree: Pasta Carbonara
Dessert: Tiramisu
Drink: Summer Berry Sangria

Pasta Carbonara


This is one of my most frequently made dishes. Quite simply because the ingredients are always available in my kitchen.

Although it has a thick creamy texture, surprisingly enough, authentic carbonara contains no cream. It is the semi-cooked egg that creates the creaminess.

Serves 2:
  • Any noodle pasta for 2 (An easy way to estimate a single serving of pasta is to wrap your thumb and forefinger around the pasta. For a man-sized serving, the thumb and forefinger should just touch. For girl-sized servings, the forefinger should reach the top joint crease of the thumb.)
  • 2 eggs, beaten
  • 5 rashers of bacon, cut into small strips
  • 3 cloves of garlic, finely minced
  • 1 1/2 cups grated parmesan reggiano
  • Freshly ground black pepper

Cook pasta in a large pot of salted water till al dente.

Fry the bacon till crisp and set aside. In the bacon fat on medium heat, saute the garlic till soft, being careful not to burn or brown the garlic. If you really really really want a creamier pasta, add 1/3 cup of cream at this point.

Add the cooked pasta, along with a small amount of pasta water to the pan of garlic. Add bacon and toss till well mixed.

Take the pan off the heat, and add egg bit by bit, stirring it well each time. The heat from the pan will cause the eggs to thicken and become creamy. Grind a generous amount of black pepper over and add 1 cup of grated parmesan and stir till pasta is completely coated.

Garnish with leftover parmesan, a light dash of pepper and serve.

See the rest of the Italian Idyll menu here:

Appetizer: Bruschetta
Dessert: Tiramisu
Drink: Summer Berry Sangria

Summer Berry Sangria


Sangria is basically red wine, chopped fruit and shots of liqueur, topped off with a non alcoholic soda and served over ice. With these basic ingredients, you can experiment with endless variations for a taste treat that takes you around the world.

Basic Sangria, makes 1 pitcher:
  • 1/2 bottle of red wine
  • 2 cups of fruit, cut into 1/2-inch cubes or slices
  • 1/2 to 1 cup fruit juice
  • 3-4 shots of liqueur
  • Non alcoholic soda to top off
Throw fruit and ice into a pitcher, add liqueur and wine and top with mixer. Stir and serve.

Summer Berry Sangria
  • 1/2 bottle red wine
  • 1 cup of frozen raspberries (squish half and leave the other half whole)
  • 1 cup of frozen blackberries (ditto as above)
  • 1 cup peach nectar/juice
  • 4 shots Limoncello
  • San Pellegrino sparkling water

Tropical Sangria
  • 1/2 bottle red wine
  • 2 cups of cubed mixed pineapples, lychees and mangoes
  • 1 cup pineapple juice
  • 4 shots Midori
  • Sprite or 7-Up

Florida Sangria
  • 1/2 bottle red wine
  • 1 cup orange slices
  • 1 cup grapefruit slices
  • 1 cup orange juice
  • 4 shots Cointreau
  • Sparkling water

See the rest of the Italian Idyll menu here:

Appetizer: Bruschetta
Entree: Pasta Carbonara
Dessert: Tiramisu

Roasted Garlic Hummus


As the Zohan would say "Hummus is the answer to every problem". It doesn't look like much, but it sure is tasty. Simple to make and packed with protein, it's my favourite dip ever.

Here's my take on a classic hummus. The roasted garlic adds a caramelly and mellow note to the dip, while the raw garlic gives it a little zing. Variations include additions of sundried tomato, black olives or even marinated artichokes.


Now for the hummus. You'll need:
  • 1 can drained chickpeas, set the liquid aside
  • 1/2 cup tahini (sesame paste) with some of its oil, optional
  • 1/4 cup extra-virgin olive oil, plus oil for drizzling
  • 3 tablespoons roasted garlic paste
  • 2 cloves garlic, peeled
  • 1 teaspoon ground paprika, plus a sprinkling for garnish 
  • 1 teaspoon ground cumin
  • Juice of 1 lemon, plus more as needed
  • Salt and freshly ground black pepper to taste
  • Sprigs of fresh parsley leaves for garnish

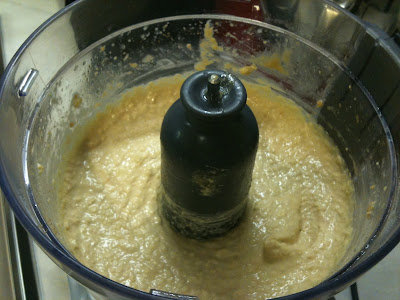
 Put everything except the parsley in a food processor and whizz. Add the chickpea liquid until you get a smooth puree. Taste and adjust the seasoning to your liking.


Spoon a heaping mound onto a pretty serving dish and make a well in the centre. Drizzle with olive oil, filling up the well and sprinkle on some paprika for colour. Top with a sprig of parsley and serve with flatbread, raw veggie sticks, crackers or chips.

Monday, June 28, 2010

Essence-tials


Essences and extracts lifts an otherwise average dish, just like how travel perks up an otherwise mundane life. I'm sure my upcoming trip to Egypt is going to yield a bonanza of scrummy yummy exotic spices and herbs. The expedition to the Khan El Khalili souk in Cairo is going to be legendary.

On my list is saffron, lavender extract, cardamom, pickled lemons, vanilla beans, anise, whole nutmeg... it might well be endless.


And what's flavour without some colour? My haul from Phoon Huat yesterday included some unusual shades for macarons, and some pretty glittery bling as well.

Table for Deux at a Parisien Bistro


Cooking for 2 is surprisingly difficult. I can do 4-6 people easily but always end up with too much food when cooking for 1 or 2.

I've decided to start a menu series, as requested by Mrs O. The first is "A Table for Deux at a Parisien Bistro". Romantic and rustic, add candlelight and a good bottle of Bordeaux, and it's a perfect prelude to some nocturnal ooh-la-la.

On the menu tonight:

Appetizer: Pork Rillettes with Baguette and Cornichons
Entree: Steak with a Shallot and Red Wine Sauce
Side: Potatoes Dauphinoise
Dessert: Creme Brulee

1 day ahead, make and store in the fridge:
  • Pork Rillettes
  • Creme Brulee

1 hour ahead:
  • Prepare Potatoes Dauphinoise
  • Prepare ingredients for the steak

1/2 hour ahead:
  • Put Potatoes Dauphinoise in the oven to bake
  • Start cooking the steak

Post-Dinner and Pre-Dessert:
  • Brulee the creme and serve

Pork Rillettes


Rillettes are classic french bistro fare. It's kind of like a pate, but not so mushy and pasty. It's got a firm bite with meat strips clearly visible. This recipe uses pork but you can use chicken or duck too.

Rillettes are great as an appetizer, a light snack or as a sandwich filling. Make in advance and store in the fridge for up to a week.

Makes 5 small, 4 medium or 3 large pots:
  • 800g of pork (You can use leaner or fatty cuts depending on your preference, but some fat is required. If you are using lean cuts, then add a small amount of belly pork)
  • Bunch of fresh thyme
  • A bag of bouquet garni (optional)
  • 1 1/2 cups of dry white wine
  • 150g of butter, melted
  • Salt and pepper to taste


Place pork and herbs into a slow cooker and add just enough water to cover the meat. Alternatively, you can simmer on the stovetop at low heat. Cook for 4-5 hours until meat is falling-apart tender.

Drain the stock from the meat and set aside. Leave to cool completely.


Shred the pork into rough bits and place in a saucepan. Season with salt and pepper to taste. Add the stock and the wine and let simmer until completely absorbed by the meat. Spoon and pack into pots and top with a layer of melted butter to seal. Chill in fridge overnight.


Serve with crackers or crusty baguette, with a side serving of cornichons and pickled onions.

The rest of the Table for Deux at a Parisien Bistro menu here:

Entree: Steak with a Shallot and Red Wine Sauce
Side: Potatoes Dauphinoise
Dessert: Creme Brulee

Steak with Red Wine and Shallot Sauce

This is fail-safe and dead easy. It's beefy, hearty and guaranteed to satisfy the biggest carnivore. Make sure you use shallots and not small red onions. Shallots have a sweetness and flavour that gives the sauce a richness and complexity that regular onions just don't have.

Serves 2
  • 2 pieces of your favourite cut of beef (a typical serving is usually 220-250g per person)
  • 6-8 shallots, sliced
  • 1 cup of red wine (A Burgundy or Bordeaux is good)
  • A knob of butter
  • Sea salt and freshly ground black pepper

Wash and dry beef steaks, then season well with salt and pepper.

Heat skillet on high heat and add 1 tablespoon of olive oil to coat the pan. The secret to good steaks in a blazing hot pan. This sears the meat and seals in the juices so it stays juicy and moist.

Resist the urge to flip the steak over and over. Sear on one side, flip, and step away from the meat.

When done to your preference, set aside to rest. In the meantime, make the sauce.

In the same skillet, lower to medium heat and add a teaspoon on olive oil. Brown shallots till soft and barely brown. Add the wine and let simmer until reduced till almost dry. Add a knob of butter for some shine and gloss, and season to taste with salt and pepper.

Spoon sauce over steak and serve. Tres magnifique!

The rest of the Table for Deux at a Parisien Bistro menu here:

Appetizer: Pork Rillettes with Baguette and Cornichons
Side: Potatoes Dauphinoise
Dessert: Creme Brulee

Potatoes Dauphinoise


Creamy. Buttery. Cheesy. Carb laden. Not for the calorie-watching or faint-hearted.

Serves 2
  • 2 large or 3 medium Russet Burbank potatoes, washed, peeled and sliced thin
  • 2 cloves garlic, sliced
  • 1.5 - 2 cups cream
  • 1 cup grated cheese (Any hard cheese like gruyere or cheddar)
  • Sea salt and freshly ground black pepper to taste

Preheat oven to 160C.

Arrange the potato and garlic slices in an ovenproof baking dish. If you want to make sure you get laid, then arrange in a pretty overlapping pattern. If bedroom-boom-boom is out of the question, then just make sure it's evenly distributed, with about a half-inch of clearance to the top of the dish.

Season whipping cream with salt and pepper and pour over potatoes. The liquid should come to just under the top of the potatoes and not completely cover them. This is because the liquid will boil while in the oven and you don't want it to bubble over. Sprinkle a generous layer of grated cheese on the top and this potato puppy is ready to hit the oven.

Bake for 20 minutes until potatoes are tender, liquid has been absorbed and cheese is golden brown.

The rest of the Table for Deux at a Parisien Bistro menu here:

Appetizer: Pork Rillettes with Baguette and Cornichons
Entree: Steak with a Shallot and Red Wine Sauce
Dessert: Creme Brulee

Creme Brulee


Creme Brulee means "burnt cream" and it is the ultimate in indulgence - a silky, creamy and wobbly custard with a caramelized sugar crust. Nothing's more satisfying than hearing the crack of the sugar crust giving way through the pressure of your greedy greedy spoon.

The one thing that makes a good Creme Brulee is vanilla. Whole vanilla pods if you can find them, otherwise a pure Madagascan vanilla paste will be a good substitute.

For 2 ramekins
  • 230ml cream
  • 2 egg yolks
  • 3 tablespoons sugar
  • 1 teaspoon vanilla paste (For 6 ramekins, you can use a whole vanilla bean.)


Preheat oven to 165C.

Heat cream and sugar in a saucepan till sugar is dissolved and it comes to a light boil.

In a separate bowl, whisk the egg yolks and vanilla.

"Proof" the egg mixture with a small amount of hot cream. This helps warm up the eggs and prevent it from cooking. Whatever you do, DO NOT dump in the cream all at once, or you'll have scrambled eggs. Slowly add the rest of the cream, whisking well.


Strain the mixture into a pouring cup, making sure any large lumps are removed. Divide the mixture between two ramekins and place in a deep overproof baking dish.

Fill up with dish with water until it comes halfway up the ramekins (known as a bain marie or water bath) and bake for 20-25 minutes. The Creme Brulee should be set but still be jiggly. Refrigerate for at least 3 hours.


When ready to serve, spread a teaspoon of white caster sugar into a thin layer on top of the custard. Caramelize with a butane torch until the sugar is golden brown.

Garnish with a few blueberries, raspberries or strawberry slices and serve.

Always a crowd pleaser. Add an Espresso and it's a great finish to a classic French meal. Takes me back to a little cafe in Montmarte...


The rest of the Table for Deux at a Parisien Bistro menu here:

Appetizer: Pork Rillettes with Baguette and Cornichons
Entree: Steak with a Shallot and Red Wine Sauce
Side: Potatoes Dauphinoise

Quick and dirty 6-ingredient chicken curry


If you're a curry snob, then this recipe is NOT for you.

But if you are, like me, a time-strapped working stiff who needs to throw something together in a hurry, then this is the perfect no-fuss dish. Great for days when you get home at 7ish after a long hard day at work.

You have no time to go to the supermarket, waste time prepping or even wash dishes. The natural urge to is to make a detour on your drive home and tar pow some food, or reach for the phone to call McDonalds home delivery. Travel and waiting time considered, it'll take at least an hour and you won't be eating till 8ish.

So, it's gonna take an hour any which way, you might as well whip up something home-cooked and give your body and taste-buds a break from crappy msg-laden junk food. Here's how to get this recipe done in under an hour.

When you do your regular grocery shopping, stock up on a few packs of curry powder and packaged coconut milk. The potatoes, onions and curry leaves can keep up to a month in your fridge. The chicken parts you can freeze and white rice in a rice cooker is a no-brainer.
  • You get home, put your crap down, turn TV on and pour yourself a big glass of wine - 5 mins
  • Chuck frozen chicken into microwave and nuke - 2 mins
  • Wash and cook rice in rice cooker - 3 mins
  • Small sip of wine - 5 secs
  • Peel and dice onion - 3 mins
  • Peel and cut potatoes - 5 mins
  • Grab packaged curry powder, coconut milk and curry leaves - 1 min
  • Big gulp of wine - 10 sec
  • Actual cooking time - 10 mins
  • Sit in front of TV and drink more wine - 30 mins

Total cooking time - 24 minutes
Total time from getting through the front door to putting food in your mouth - 59 minutes 15 seconds

Serves 2
  • 4 pieces cut chicken parts (Breast, thigh or drumstick. If using wings, use 6-8 pieces.)
  • 3 small waxy potatoes, peeled and halved
  • 100g pack of your favourite curry powder
  • 10 curry leaves
  • 1 large red or yellow onion, diced
  • 500ml coconut cream (Kara brand is good)

Heat 2 tablespoons on high heat in a pot. Throw in the curry leaves and let sizzle for a few seconds, then brown the diced onions till soft and translucent. Add curry powder and let the heat cook the spices till fragrant, about 2 minutes. If you prefer more heat in your curry, add a few tablespoons of packaged chilli paste.

Add chicken, making sure it's evenly coated with the curry powder paste and cooked through. This will take about 3 minutes. Once the chicken is cooked, drop in the potatoes and pour in the coconut milk. Top up with some water to ensure that the chicken and potatoes are covered. Bring to a boil, then turn down heat to low and let simmer for 30 minutes or until chicken is tender. Season to taste with salt.

I did the math on the wash-up count:
  • 1 cutting board
  • 1 knife
  • 1 veggie peeler
  • 1 pot
  • 1 cooking spoon or ladle

If you count the serving dishes and rice cooker:
  • 2 bowls or plates
  • 2 spoons
  • 2 forks
  • 1 rice cooker pot and lid

How's that for quick and dirty curry, with a quickie clean-up?

Chorizo and portobello risotto with prosciutto crunch

Risotto has a bad rep for being difficult to make. Which is totally undeserved as far as I'm concerned.

Like most things in life, it needs some care and attention, which doesn't necessarily mean being difficult. The science behind risotto is simple. The constant stirring and the gradual addition of liquids coaxes out the starches from the rice grains. This is what gives you the creamy texture of the dish.

This is a western take of one of my favourite childhood meals. A typical after-school lunch would be a simple plain porridge with bits of seasoned pork, topped with crumbled deep fried crispy vegetarian salted fish. That stuff is near impossible to buy, and it's such a treat because my Grand Aunt from Penang would make it and send it over.

It's simply layers of sheets of beancurd skin and fermented beancurd paste. It's arduous to make because each layer had to be completely sun-dried before the next layer went on. It could take up to a month to make, depending on whether the weather was cooperative. When deep fried, it puffs up into a crispy, pungent, salty little pillow of melt-in-your-mouth scrumptiousness.

This risotto dish is inspired by the blend of contrasting textures and flavours from my childhood. It combines the creamy velvet of the risotto, with the chorizo lending a spicy kick, topped with the contrasting crunch of crispy and salty proscuitto in every bite.

Serves 4 as entree, 8 as appetiser
  • 2 tbsp extra virgin olive oil
  • 2 cups sliced chorizo
  • 3 cups sliced portobello or any other mushrooms you prefer
  • 8 slices of prosciutto
  • 1 onion, thinly sliced
  • Fresh thyme
  • 1.5 cups dry white wine
  • 6 cups chicken broth
  • 1/2 cup butter
  • 4 garlic cloves, minced
  • 2 cups arborio rice (or any short grain rice)
  • 1 cup grated parmesan reggiano
  • Salt and pepper to taste

Heat olive oil in a skillet and brown chorizo. Add mushrooms and thyme and saute until tender. Chuck in the booze and simmer until liquid is absorbed and reduced by about half. Set aside.

Preheat oven to 160C. Spread out the prosciutto slices on a non-stick baking sheet for 10-12 minutes until crispy. Drain on paper towels to remove excess oil and set aside.

Get all your ingredients ready and stand by to stir for at least 20 minutes. Putting the TV on usually helps to distract you from the lactic acid building up in your bicep. Switch arms every once in awhile, you really don't want lopsided arms.

On medium heat, melt butter and cook onions and garlic till tender and translucent. Dump in the rice and stir it around for a couple of minutes. Turn heat down to low.

Now, the trick from here is to add liquid cup by cup, stirring gently until each cup of liquid is absorbed before adding the next. There are no shortcuts here, just patience and a watchful eye. There are no hard and fast rules either, just keep adding liquid and stirring until the rice grains are cooked al dente.

As you stir and add liquid, the mixture will become creamier. This is a sign that the rice grains are absorbing the liquid and the starch is being released. When the risotto is done, stir in the mushroom mixture and half a cup of grated parmesan and mix well.

Season with sea salt and freshly ground black pepper to taste. Garnish with a sprinkle of grated cheese and top with a crispy slice of prosciutto.

This is my favourite rainy weather dish - curled up in front of the TV and wrapped up in a blanket. The ultimate comfort food.

Cocoa-licious


Happiness is Valhorna 72% Aruguani dark chocolate and dutch-processed cocoa. That, and a shameless shopping trip to Phoon Huat for my baking fix.

I firmly stand behind the fact that chocolate is good for you. And now that the men in white coats have verified that it indeed has anti-oxidants, gives you an endorphine rush and improves performance and mood, my chocolate addiction is now somehow legitimized.

So, 35 buckaroos will bring you good health and happiness. Go forth and indulge!

Beer butt chicken


I have a theory about how this recipe came about.

Some skanky chef ho probaby got tanked on beer in a sleazy bar, picked up a random dude and got laid hard in a one night stand. The next morning, she woke up with a blazing hangover and a really sore ass. She looked around and one-night-stand guy was gone. It was probably the best lay in her life, and she was devastated knowing that she'll never see (and screw) him again. And so, she created a dish to remember him for all eternity.

The alternative backstory is that some guy put together all his favourite things ever - beer, buttf*cking and chicken. I think this is the more probable of the two.

Here's what you need for a drunken anal taste delight (pardon the puns, I simply can't resist):
  • One big fat juicy chicken
  • 1/2 cup dry salt and spice rub (This is basically a combination of sea salt and spices. I like rosemary, chilli flakes, paprika, thyme, coriander and ground black pepper, but you can use any spices you prefer. If you can't be arsed, then use any store-bought marinade.)
  • 1 tbsp dijon mustard
  • 2 tbsp of honey
  • 3 tbsp olive oil
  • 1 can of beer (Different types of beers give different flavours, so experiment. I personally like a dark wheat beer and Guinness as it gives a rich and deep flavour. Using Coke is also an alternative, but if you do, don't add honey and include a generous dash of bourbon.)
  • 1 cup of garlic butter (Make this by mincing 3-4 garlic cloves and mixing into softened butter.)

Wash and clean the chicken. Slide a finger between the skin and the breast meat to make as large a pocket as possible, being careful not to tear the skin. Stuff in the garlic butter in the pocket, using your hands to squeeze the butter over as much of the breast meat as possible and even out the layer of butter. This helps keep the breast meat moist as the chicken cooks and gives it a killer garlic kick.

Rub the salt and spice mix liberally over and inside the chicken. Add the olive oil, honey, mustard and half a can of beer and massage that chicken good.

Let him soak in the tub for at least a couple of hours in the fridge, overnight if you have the time.

Preheat the oven to 160C.

Stuff the beer can with the remaining beer up his butt and stand it up on a roasting pan or dish. The trick is to make a "tripod" with the can and the two legs. You'll find that the law of physics will prevail and you'll have a surprising stable bird.

Roast at 160C for 1 hour 15 mins, making sure you rotate it every now and then so it gets an even tan. Use the leftover marinade to baste. In the last 15 minutes, crank up the temperature to 190C so the skin gets golden and crisp.

Remove from oven and let rest for 10 minutes. This helps to juices return back into the meat. In the meantime, get cracking on the gravy.

Remove can from butt and pour all the juices into a saucepan. Mix 1 tablespoon of cornstarch with as little water as possible to make a paste and add to roasting juices. Bring to a boil and the gravy will thicken. Chuck in a knob of butter for some gloss and you're ready to chow down.

Macaron madness

Tomorrow I will make macarons. They're tough little sonafabitches to make, and it took me 4 weeks of devastating, ego-destroying failure to get them right. In the meantime, the entire office suffered batch upon batch of wonky macarons. Tough shit.

It's just that there are so many variables that determine whether they come out right, and it took a scientific approach to figure out what variable did what. Humidity, heat, technique... screw up one of them and your batch is f*cked.

But it all boils down to 4 simple things:
  1. Precision - Measure everything down to the last gram. If you don't have a digital scale, invest in one. $50 will save you mucho frustration and pain.
  2. Aged egg whites - This means leaving the egg whites in the fridge for at least 24 hours, if not more. This removes the moisture.
  3. Oven temperature - Unless you have a newfangled digital oven, the internal temperature of ovens aren't usually the same as indicated on the dial. Get an oven thermometer so you know exactly what the temperature is on the inside.
  4. Hairdryer - This one needs a bit of explaining....
After piping the batter, a dry "skin" needs to form on top of the macaron before it's baked. This causes the batter to be forced out from UNDER the macaron as it rises. This lifts up the shell, and creates a "ruffle" at the base, known as "feet". It also keeps the tops of the shells smooth and uncracked.

In our humid weather, the skin may have difficulty forming, even in an air-conditioned room. Batch after batch, I waited hours upon hours for those evil things to dry but no cigar.

Here's where the hairdryer comes in to make sure it happens (or at least speed it up). Set on cool and blast those suckers dry. Perfect macaron guaranteed every time.

This whole macaron journey is kind of like a metaphor for life. Nothing in life comes easy, but you stick with it and somehow, some way (albeit weird), you'll figure it out. Either that or when you're a Type A anal-retentive perfectionist, you'll torture everyone around you until you get things done the way you want.

Who'd have thunk the secret to tropical weather macarons is a hairdryer? Stranger things have happened.

Decadent double chocolate fudge cupcakes


There are some days when I'm so blue there's nothing that will cheer me up except these 1,000 calorie cupcakes. Or when I've got the choco-holic cravings so bad, I just want to drown in a vat of Valhorna chocolate and die.

They're dense, fudgy, gooey chocolate orgasms in little paper cups. No sex? No problem. These will make you come in your panties.

I always say, if you're gonna eat those calories, don't waste it on crap chocolate. Use the best, go for broke on Valhorna. Trust me, your ass will be gigantic, but it'll be worth it.

For the cupcakes:
  • 1 oz unsweetened dark chocolate
  • 3 tbsp unsalted butter, softened
  • 1/2 cup lightly packed demerara sugar
  • 1 egg yolk
  • 1/2 cup plain flour
  • 1/2 tsp baking powder
  • 1/2 tsp pure Madagascar vanilla extract
  • Pinch of salt

For the frosting:
  • 1 oz unsweetened dark chocolate
  • 1/2 tbsp unsalted butter, softened
  • 1/2 cup icing sugar, sifted
  • 2 tsp milk
  • 1/2 tsp pure Madagascar vanilla extract

Preheat oven to 190C.

To make cupcakes, melt chocolate and butter in a bowl over lightly simmering water. Resist urge to eat chocolate at this point.

In a separate bowl, sift the flour, baking powder and salt.

Cream the egg yolk, butter and sugar in another bowl till light, fluffy and pale yellow. If feeling frustrated at work, envision asshole in question and beat the crap out of him/her. Otherwise, make significant other put in some elbow grease. Or, like me, just use the KitchenAid mixer.

Fold in the flour mixture. When incorporated, add in melted chocolate and vanilla and mix well.

Divide batter between 6 paper lined cupcake tins and bake for 18-20 minutes. You'll know when it's done when an inserted toothpick comes out clean.

Inhale divine chocolate aroma and try not to spazz out.

For the icing, melt chocolate and butter in the same way. Once melted, remove from heat and let cool for a minute, then stir in icing sugar. Add the milk and vanilla and you'll have an icing so glossy you'll see your face in it. Frost when cupcakes are completely cool.

Position yourself on the couch, put on "How I Met Your Mother", peel back cupcake wrapper, take a bite, die and go to chocolate heaven.

Sunday, June 27, 2010

Baby spinach salad


This is really quick to throw together, and makes for a great side dish, or even as a light meal. Tender baby spinach leaves and buttery baby portobellos, dressed in a homemade dressing and topped with crunchy bacon bits and creamy feta cheese. Veggies never tasted quite so sinful.

Made this last night, only to discover that GBF isn't a big fan of spinach. Ah well, c'est la vie. Will give him something else next weekend then.

Serves 2
  • Couple of handfuls of baby spinach, washed and dried
  • 4-5 baby portobello mushrooms, sliced
  • Knob of butter
  • 1/3 cup extra virgin olive oil
  • 1/4 cup balsamic vinegar
  • 1 tbsp wholegrain mustard
  • A few rashers of bacon
  • 2-inch cube of feta cheese
  • Freshly ground black pepper and sea salt to taste

Cut bacon into strips, fry till crisp, drain on paper towels and set aside.

In a pan, melt a knob of butter and saute mushrooms till soft. Set aside in a bowl with juices. If you like your salad a little wilted, you can start on the salad right away so that the heat from the mushrooms cook the leaves slightly. For crunchier leaves, let the mushrooms cool completely.

To make the dressing, whisk oil, vinegar and mustard until it emulsifies (becomes thick and gel-like). If you don't have a whisk, put the ingredients in a jar with a screw-on cap and shake the living crap out of it.

Add spinach leaves to the mushrooms and toss with dressing. Sprinkle on the crispy bacon and crumble feta over. Add pepper and salt to taste.

A great add-on to this is a poached egg. Break through the yolk and let the creamy oozy yolk mix in... Sinfully delicious.

I quiche you not. It's that easy.


Repeat after me. "Quiches and pastry are not scary and difficult to make".

With a food processor, you'll be able to whip up a quiche in under an hour flat. 10 minutes if you make the pastry ahead and store in the fridge so you have it on hand whenever a quiche attack hits you. Or if you prefer, simply use frozen shortcrust pastry. It works just as well.

Here's what you need for a basic shortcrust dough:
  • 2 cups all-purpose flour
  • 1 tsp salt
  • 1/4 tsp sugar
  • 6 oz cold butter, cut into 1/2 inch bits
  • 4 tbsp cold shortening (you can replace this with butter if you like a richer more buttery crust)
  • 1/2 cup iced water, plus more as needed

Dump in all the dry ingredients into the food processor, throw in the butter and shortening. Whizz it around until the mixture resembles fine breadcrumbs.

So far so easy right?

Add the water slowly, flicking the food processor on and off. Keep adding water until the dough starts to clump onto the blade into a single mass.

Once that happens, remove from food processor and place onto a floured surface. Knead lightly until it forms a consistent ball. Roll it up into a ball and cover with cling wrap. Resist the urge to over handle the dough or the heat from your hands will melt the butter and you'll end up with an oily mess. Chill for at least 2 hours in the fridge before using.

The refrigerated dough keeps well for a few days. But if you want it to last for several weeks, wrap it in an airtight plastic bag and freeze.

To bake the crust:

Heat oven to 190C.

To line the quiche tin/pan, simply roll out the dough on a floured surface. The dough circle should be about 2 inches larger than your quiche tin.

Place the sheet over the greased quiche dish, gently press down into the bottom. Trim the excess dough 1/4 inch from the edge and roll it up to make the edge of the crust. It doesn't have to be a fancy pattern, a thicker edge is needed as the dough will shrink slightly and pull away when it's baked. All you need is a little "lip" to keep the filling from spilling out.

Prick the bottom with a fork. Place a piece of parchment or greaseproof paper over to form a little basket, then fill with rice/ dry beans/ ceramic or glass baking beans. This helps to weigh down the bottom of the crust so that the hot air won't cause it to puff up.

Bake for 7 to 10 minutes till light golden brown.

Now, onto the basic filling:
  • 3 large eggs
  • 1.5 cups of cream
  • Salt and pepper to taste
  • 2 tbsp butter cut into pea-sized dots

Beat eggs, add cream and seasonings. That's your basic quiche mixture. You can add any other kinds of seasonings, spices and herbs that you like.

At this point, add the other ingredients to the empty pastry shell. Pour on the egg and cream mixture and dot with butter. Bake at 190C for 25 - 30 minutes or until quiche has puffed and browned.

Here's a whole list of quiche variations you can make with the basic recipe:
  • Quiche Provencal - Slices of fresh tomato
  • Quiche Lorraine - Lightly browned strips of bacon
  • Quiche Fromage - Cubes of any cheese you like
  • Quiche Oignons - Browned caramelized onions

Or my personal favourite, the "The Kitchen Sink" - browned bacon, cheese cubes, slices of leek, onion and mushroom. Good hot or cold, perfect as a snack, and even doubles up as a hearty lunch with a side salad.

Naked Tiramisu


It's one of my favourite desserts. A simple pairing of great flavours, pulled together in the simplest of ways. Did you know the name tirami su literally means "pick me up" or "pull me up" in reference to the effects of the espresso?

I decided to start with this recipe because the versions you find in stores are frequently bastardized. It's a real shame because it's so simple to put together and tastes so much better when stripped down naked.

Serves 6
  • Ladyfinger biscuits
  • 500g Marscapone cheese, softened to room temperature
  • 2 large egg whites
  • 1/2 cup sugar (or to taste)
  • 4 shots freshly brewed espresso
  • 1/2 cup of your favourite liqueur (I like Baileys, but you can use rum, kahlua, anything you like!)
  • Cocoa powder or finely grated dark chocolate

Beat egg whites with sugar until glossy and stiff peaks start forming. Fold gently into the softened marscapone cheese until the mixture is consistent.

Put down a layer of ladyfinger biscuits on the bottom of individual cups or pots, breaking them up to fit your cups.

Spoon 3 teaspoons of espresso and 1 teaspoon of liqueur on the ladyfingers. You can add more or less of espresso and liqueur as you like. The more liquid you add, the more intense the coffee flavour, but it also makes for a wetter consistency, much like a trifle or pudding. The less liquid, the dryer and more cakey the consistency.

Slap on a layer of the marscapone cheese mixture so that it covers the biscuits, then repeat the biscuit and cheese layers till the cup is full.

Dust on a thin layer of cocoa or grated dark chocolate and chill for at least an hour.

Serve, sit back and watch your guests enjoy. Bask in their compliments and embrace your inner domestic goddess.

See the rest of the Italian Idyll menu here:

Appetizer: Bruschetta
Entree: Pasta Carbonara
Drink: Summer Berry Sangria